Stripe Payments — Node.js Store Add-on
Take card, Apple Pay and Google Pay payments in your Node.js store through Stripe Checkout
Everything included
- Stripe Checkout Sessions (hosted payment page)
- Charges in the customer's chosen currency
- Webhook signature verified (HMAC-SHA256, 5-minute window)
- Amount and currency checked before marking paid
- Return page re-checks the session with Stripe
- Settings in the store's Add-ons screen
From order to a live website
- 1
Buy the add-on
One-time price; the licence key and download link arrive by email and in My Account.
- 2
Copy into addons/
Drop the folder into your store's addons/ folder and restart the app.
- 3
Enable and configure
Admin → Add-ons: enable it, paste the licence key and fill in its settings.
Who it is for
This add-on is for Northfield store owners who want to take card payments online without handling card numbers themselves. The Northfield store already takes cash on delivery, bank transfer, UPI with a QR code and pay on pickup; this folder adds a fifth option, Card (Stripe), next to them at checkout. It suits shops that already have a Stripe account, or that sell in a country where Stripe is available and want the cards and wallets Stripe Checkout shows, such as Apple Pay and Google Pay when you have them switched on in your Stripe dashboard.
- Adds a Card (Stripe) method at checkout
- Install by copying one folder into addons/ and restarting
- No changes to the store's own code
- Works next to COD, bank transfer, UPI and pickup
- You keep your own Stripe account and payouts
Card payments without handling card data
When the customer places an order and picks Card (Stripe), the store creates a Stripe Checkout Session for that one order and sends the customer to Stripe's own page. Card numbers are typed there, never on your server. The session carries the exact order total in the order's currency, the customer's email, and the order id and number as metadata on both the session and the payment, so you can find the order from the Stripe dashboard. You can change the line item name Stripe shows; by default it is Order #{number}. If the customer cancels on Stripe, they come back to their order page and can try again. Before the add-on licence is active on your live domain, the store does not start a Stripe payment there and adds a note to the order instead.
- Hosted Stripe Checkout page
- Customer email and order number passed to Stripe
- Line item name you can change
- Cancel returns the customer to the order page
Only verified payments count
The order is marked paid when Stripe's webhook arrives with a valid Stripe-Signature header: an HMAC-SHA256 of the timestamp and the exact request body, checked with your signing secret and refused if it is more than five minutes old. The paid amount and currency must also match what the store expected for that order. If they do not, the order stays unpaid and a note is added to its history so you can look into it. When the customer returns from Stripe, the add-on also reads the session back from Stripe, so the order page can show Paid straight away without trusting the redirect. A webhook that arrives twice changes nothing.
- Signed webhooks only, five-minute window
- Amount and currency must match
- Mismatches noted in the order history
- Repeated webhooks are harmless
What you see in the admin
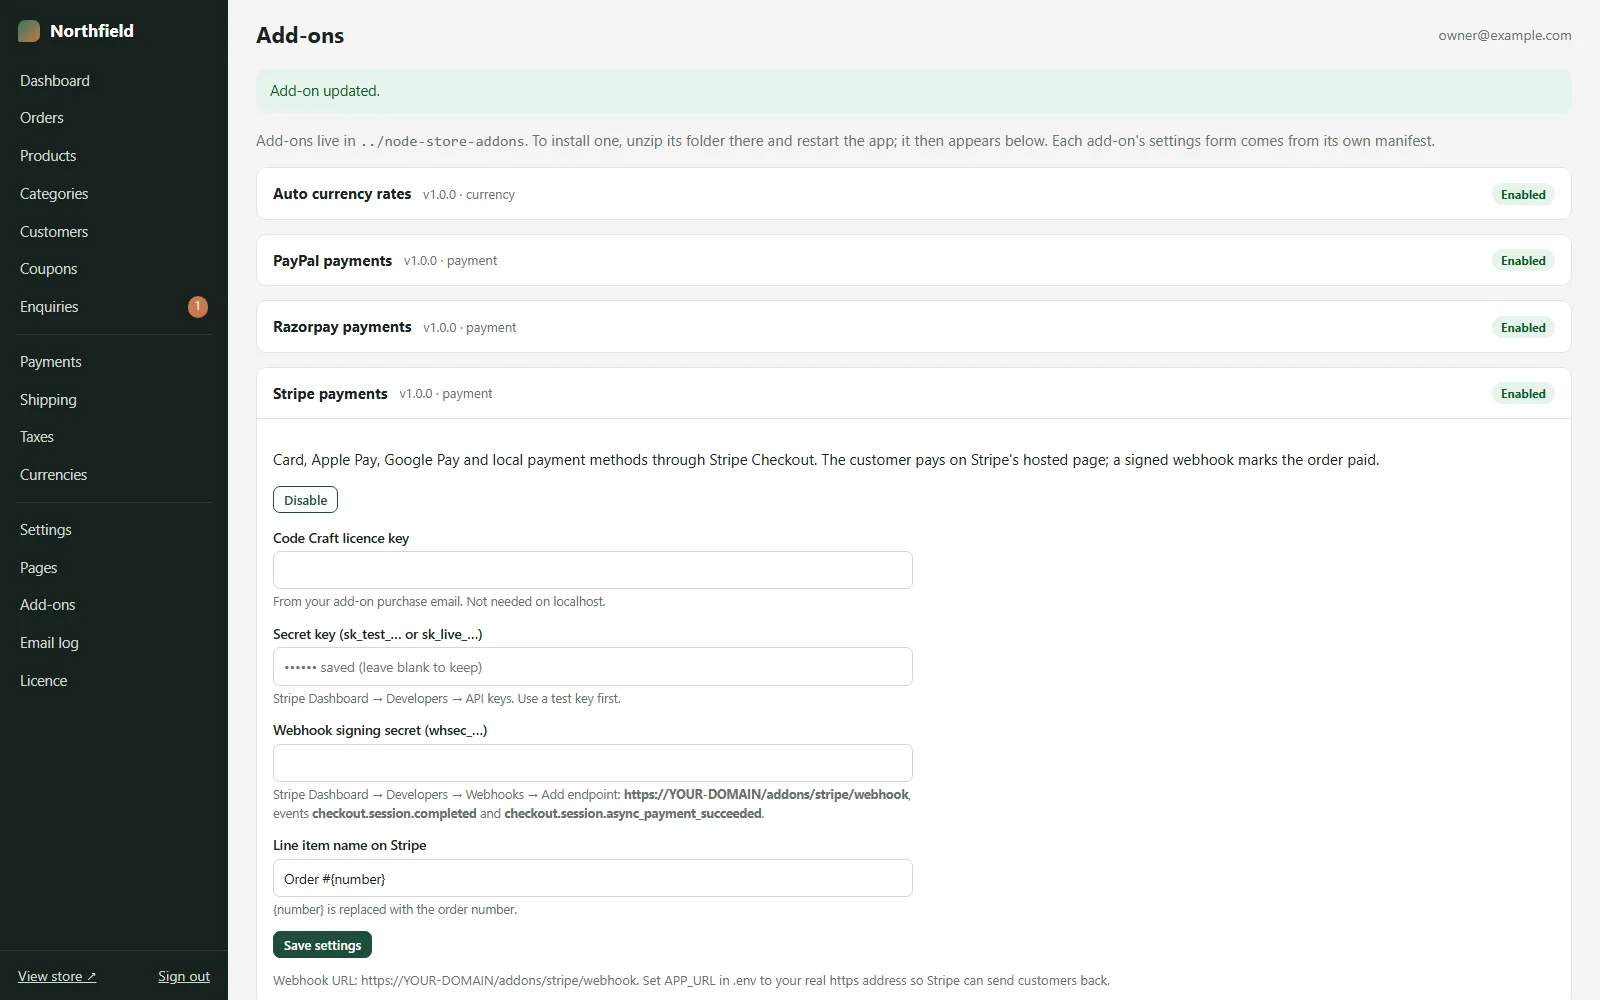
Once the folder is in addons/ and the store has restarted, Stripe payments appears in Admin → Add-ons with a form for the secret key, the webhook signing secret, the line item name and your add-on licence key. Secrets are kept when you save the form with the field left blank. After you enable it, the Card (Stripe) method shows up in Admin → Payments, where you can rename it, describe it and move it up or down the list. Each order paid through Stripe records the Stripe payment reference and a timeline entry when the Checkout session is created and when the payment is confirmed.
- Settings form in Admin → Add-ons
- Method title and order in Admin → Payments
- Stripe reference saved on the order
- Timeline entries for each payment step
Limits to know
Refunds are not sent from the store: make the refund in your Stripe dashboard, then set the order to Refunded in the store admin, which puts the stock back. The add-on charges in whichever currency the order is in, so that currency must be one your Stripe account accepts, and its decimals in Admin → Currencies must match the currency (0 for JPY, for example). Subscriptions, saved cards and Stripe Elements on your own page are not part of this add-on. It was tested only against mocked Stripe responses, never with a real Stripe account or real money.
- Refunds made in the Stripe dashboard
- One-off payments, no subscriptions
- Tested against mocks, not real payments
More ready-made websites
Built by the same team, with the same setup service and support.
Browse every ready-made website, or compare our custom website packages if you need a site designed from scratch. Want more guests to find you on Google Maps? See our local SEO service, or talk to our web design team.