Razorpay Payments — Node.js Store Add-on
Accept UPI, cards, net banking and wallets in your Node.js store with Razorpay Checkout
Everything included
- Razorpay Orders API and Standard Checkout
- UPI, cards, net banking and wallets
- Payment signature verified on the server
- Optional signed webhook with amount check
- Key secret never sent to the browser
- Settings in the store's Add-ons screen
From order to a live website
- 1
Buy the add-on
One-time price; the licence key and download link arrive by email and in My Account.
- 2
Copy into addons/
Drop the folder into your store's addons/ folder and restart the app.
- 3
Enable and configure
Admin → Add-ons: enable it, paste the licence key and fill in its settings.
Who it is for
This add-on is for Northfield stores that sell mainly to customers in India and want them to pay online with UPI apps, cards, net banking or wallets. The store's built-in UPI method shows a QR code and leaves you to check your bank account; with Razorpay the payment is confirmed automatically and the order moves to Paid on its own. It needs your own Razorpay account, with its KYC and settlement set up on Razorpay's side.
- Automatic confirmation instead of checking UPI by hand
- Works next to COD, bank transfer and pickup
- Your own Razorpay account and settlements
The payment methods Indian customers expect
When the customer chooses UPI, cards & net banking (Razorpay) at checkout, the store creates a Razorpay order through the Orders API for the order total, with the store order number as the receipt. The customer then sees a short pay page with the order number and amount, and the Razorpay Checkout window opens straight away with their name, email and phone already filled in and your store's main colour. If they close it, a Pay now button opens it again, and a link takes them back to their order. Razorpay Checkout shows the methods enabled on your account, on desktop and on phones.
- One Razorpay order per store order
- Customer details pre-filled
- Checkout window in your store colour
- Pay now button and a way back to the order
Verified on the server
After payment Razorpay posts the payment id, order id and signature back to the store. The store recomputes HMAC-SHA256 of order id and payment id with your key secret and accepts it only if it matches and the Razorpay order id is the one it created for that store order. A forged or mismatched callback is rejected and noted in the order history. If you add a webhook, payment.captured and order.paid events are accepted only with a valid X-Razorpay-Signature, made with your webhook secret over the exact request body, and the paid amount and currency must match the order. Your key secret stays on the server; only the key id reaches the browser.
- Forged callbacks rejected
- Webhook signature checked
- Amount and currency compared on webhooks
- Key secret never sent to the browser
What you see in the admin
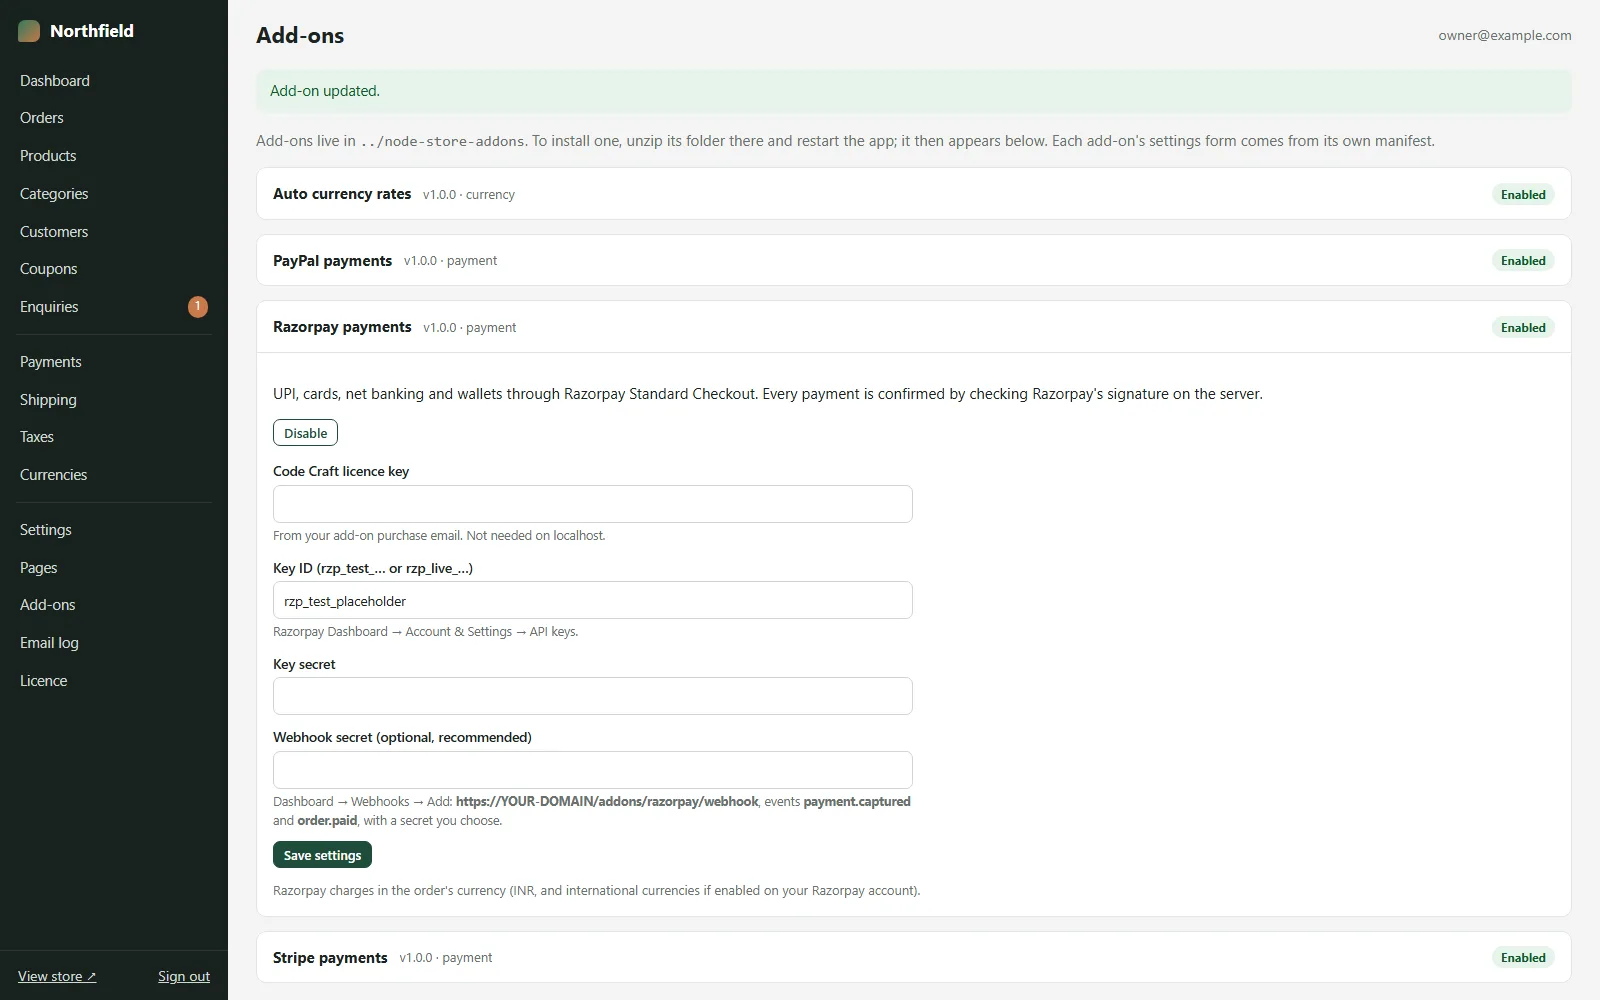
Razorpay payments appears in Admin → Add-ons with fields for the key id, key secret, an optional webhook secret and your add-on licence key. Once enabled, the method appears in Admin → Payments, where you can rename it and set its place in the list. Each order's timeline shows when the Razorpay order was created and for how much, and when Razorpay confirmed the payment, and the Razorpay payment id is stored on the order as its payment reference.
- Settings form in Admin → Add-ons
- Rename and reorder in Admin → Payments
- Razorpay ids saved on the order
- Timeline entries per payment step
Installing and going live
The zip holds one folder, razorpay, with its index.js and a README. Copy it into your store's addons/ folder, restart the app (Restart app on Hostinger or cPanel, pm2 restart store on a VPS) and open Admin → Add-ons. Press Enable, paste your add-on licence key and your Razorpay test keys, and save. Add the webhook in the Razorpay Dashboard if you want the second confirmation path. Place a test order in INR, pay it in Razorpay test mode and check that the order shows Paid with a Razorpay payment id. When everything looks right, replace the test keys with your live key id and secret. Until the add-on licence is active on your live domain, the store will not start a Razorpay payment there and notes this on the order.
- Copy, restart, enable
- Test mode first, live keys after
- Licence checked on your live domain
Limits to know
Refunds are made in the Razorpay Dashboard, not from the store; afterwards set the order to Refunded in the store admin so the stock goes back. Razorpay charges in the order's currency: INR works on every account, other currencies only if international payments are enabled on yours. Subscriptions, payment links and Razorpay Route are not included. The add-on was tested against mocked Razorpay responses, never with a real account or real money.
- Refunds in the Razorpay Dashboard
- INR by default, others need international payments
- Tested against mocks, not real payments
More ready-made websites
Built by the same team, with the same setup service and support.
Browse every ready-made website, or compare our custom website packages if you need a site designed from scratch. Want more guests to find you on Google Maps? See our local SEO service, or talk to our web design team.