Stripe Payments Add-on for Code Craft Store (Next.js)
Take card, Apple Pay and Google Pay payments in the Next.js store through Stripe Checkout, with signed webhooks
Everything included
- Stripe Checkout Sessions (hosted payment page)
- Webhook signature check with timestamp tolerance
- Session re-read from Stripe on return
- Amount and currency checked before marking paid
- Idempotency key on session creation
- Settings and licence key in Admin → Add-ons
From order to a live website
- 1
Buy the add-on
One-time price. Your download link and licence key arrive by email and in My Account.
- 2
Drop it in
Copy the folder into addons/, rebuild and restart the store.
- 3
Configure
Pick Stripe at checkout, pay on Stripe's page, and come back to a paid order. If the shopper closes the tab after paying, the signed webhook still marks the order paid.
Who it is for
This add-on is for shops running Code Craft Store: Next.js Ecommerce that want to take card payments online without card numbers ever touching their server. The store already has cash on delivery, bank transfer, UPI and pay on pickup built in; this adds Card / wallet (Stripe) next to them. Stripe Checkout shows the cards and wallets you switch on in your Stripe dashboard, such as Apple Pay and Google Pay. You need your own Stripe account; payouts go straight from Stripe to you.
- Adds Card / wallet (Stripe) at checkout
- Card details typed on Stripe, not on your site
- Your own Stripe account and payouts
How a Stripe payment runs
When the shopper places an order and picks Stripe, the store creates a Checkout Session for exactly that order: one line with the order description, the total in the order's currency in its smallest unit, the shopper's email, and the order number as the client reference and as metadata on the session and the payment. The request carries an idempotency key built from the order number, amount and currency, so a double click cannot create two different sessions. The shopper pays on Stripe's page. If they cancel, they return to their order page with a notice that the payment did not go through.
- One Checkout Session per order
- Idempotency key on session creation
- Order number stored on the Stripe payment
- Cancel returns to the order page
Never trusting the redirect
When the shopper comes back, the add-on does not take the return link at its word: it reads the session from Stripe and only reports it paid if Stripe says so and the session belongs to that same order. Stripe's webhook is the second path: each call must carry a Stripe-Signature header that matches an HMAC-SHA256 of the timestamp and the exact body, made with your signing secret and no more than five minutes old. Tampered bodies, wrong secrets, old timestamps and missing headers are all refused. Before any order is marked paid, the store itself compares the paid amount and currency with the order total, and a mismatch is written to the order timeline instead. Failed delayed payments and expired sessions are recorded on the order too.
- Session re-read from Stripe on return
- Signed webhooks, five-minute tolerance
- Amount and currency checked by the store
- Failed and expired sessions noted on the order
What you see in the admin
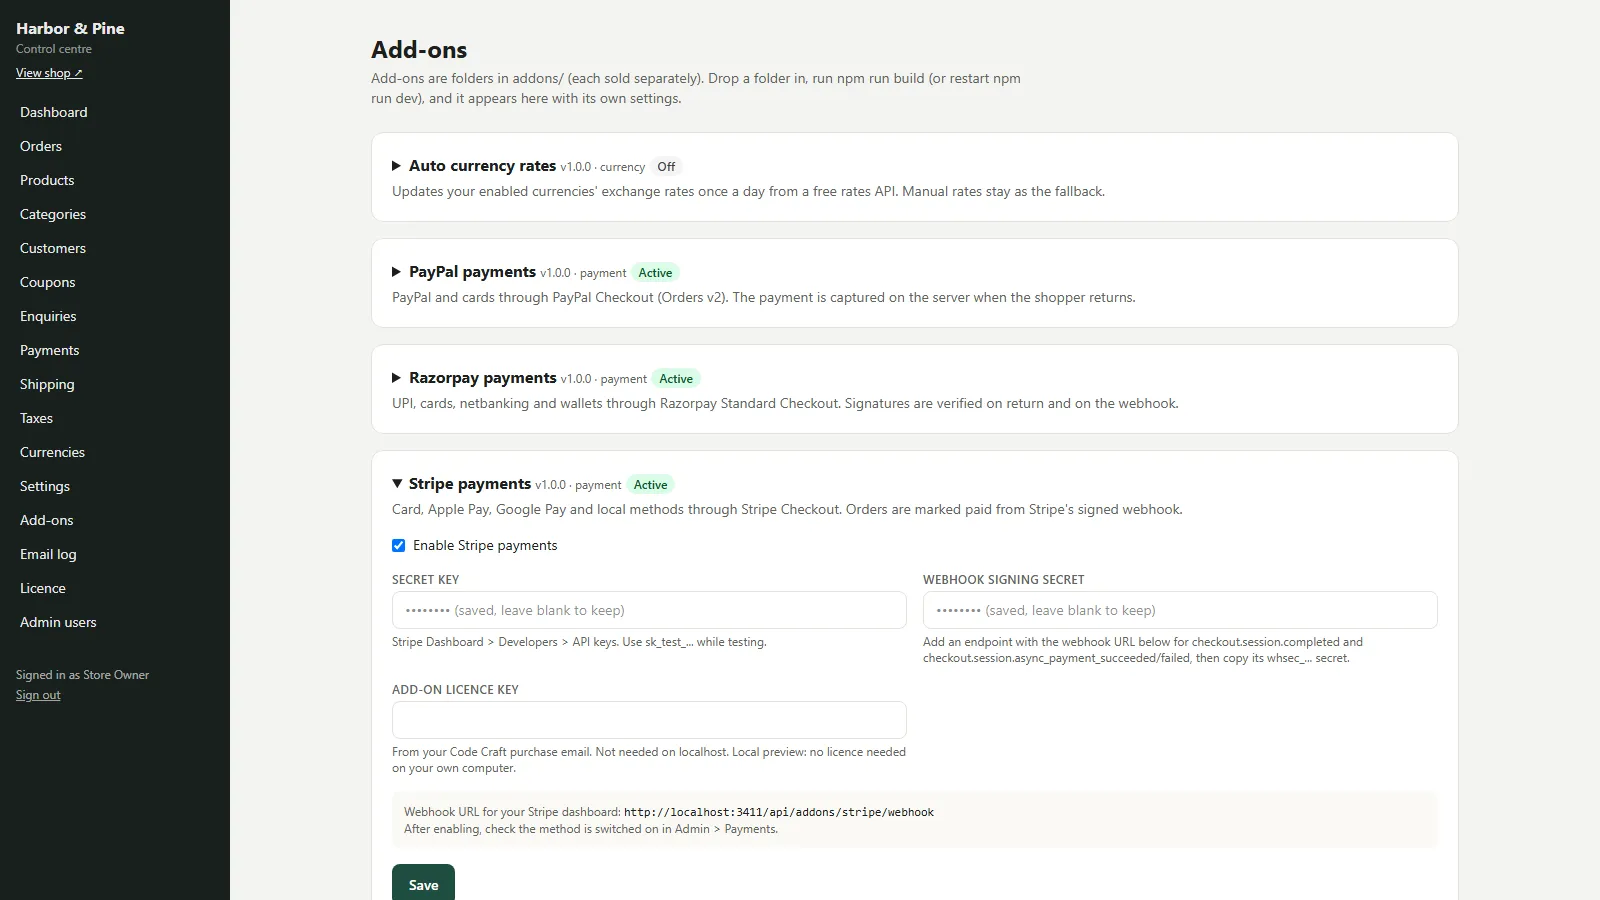
Stripe payments has two required settings in Admin → Add-ons, the secret key and the webhook signing secret, plus the licence key field. Once it is enabled, the method also appears in Admin → Payments, where you can rename it and set its position among your payment methods. A paid order records the Stripe reference and moves from pending to paid with a timeline entry, which also sends the usual status email to the shopper.
- Two settings and a licence key
- Rename and reorder in Admin → Payments
- Stripe reference on each paid order
Installing and going live
The zip holds the stripe/ folder with its source, its tests, a README and a PDF guide. Copy it into the store as addons/stripe/ (keep the folder name), then run npm run build and restart the store, or restart npm run dev while you try it. scripts/sync-addons.mjs registers it automatically. Open Admin → Add-ons → Stripe payments, tick Enable, fill in the settings and paste the add-on licence key, which is not needed on localhost. Test with your sk_test_ key and Stripe's test cards, then swap in sk_live_ and the live webhook secret. Until the add-on licence is active on your live domain, the store treats the add-on as switched off.
- Copy, rebuild, enable
- Licence key per add-on
- npm test runs its mocked tests
Limits to know
Refunds are made in the Stripe Dashboard; then set the order to Refunded in the store, which puts the stock back. The order currency must be one your Stripe account can charge. Subscriptions, saved cards and card fields embedded in your own checkout page are not included. The add-on was tested only against mocked Stripe responses, never with a real Stripe account or real money.
- Refunds in the Stripe Dashboard
- One-off payments only
- Tested against mocks, not real payments
Requires Code Craft Store
This is an add-on for Code Craft Store: Next.js Ecommerce, sold separately. Copy its folder into the store's addons/ folder, rebuild, and configure it in Admin → Add-ons. Each add-on has its own licence key.
- Works with Code Craft Store 1.0 or later
- Installed in minutes, no code changes
- Its own settings screen in the admin
More ready-made websites
Built by the same team, with the same setup service and support.
Browse every ready-made website, or compare our custom website packages if you need a site designed from scratch. Want more guests to find you on Google Maps? See our local SEO service, or talk to our web design team.